Doors dismantled...
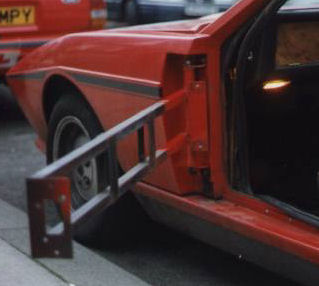
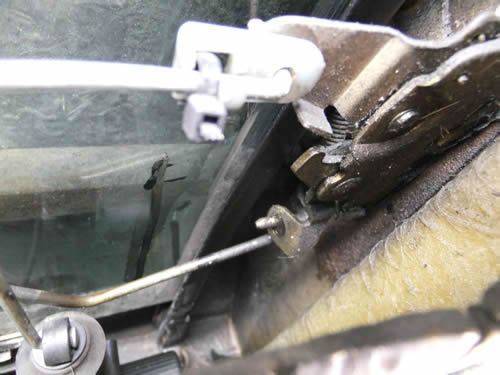
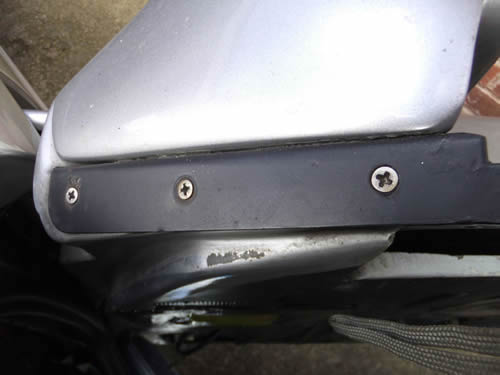
The doors on the TVR wedges are constructed as follows (the drop-head differing from the fixed-head mostly in the lack of an external frame for the glass!). A substantial framework of steel box section is welded to the vertical hinge tube at the leading edge of the door. The frame pivots around a 1/2" steel rod, using Nylon bushes pressed into the top and bottom of the hinge tube. The steel rod is supported at each end by an angled steel bracket, bolted through the GRP bodywork to a reinforcing tube inside the car. The lower end of this tube is bolted (through the inner fibreglass sill) to the chassis.The door shell itself (made from two GRP sections bonded together) is simply slid over the steel framework and secured at leading edge by two studs, and at the trailing edge by two screws adjacent to the door latch. The door latch mechanism (ex-Fiesta) is held by screws through the trailing edge of the door shell and the framework inside it. This photo, of a 1980 Series 1 FHC I owned prior to 2001, shows the door frame with the shell removed - you can make out the latch mounting screw holes and the two leading edge studs:
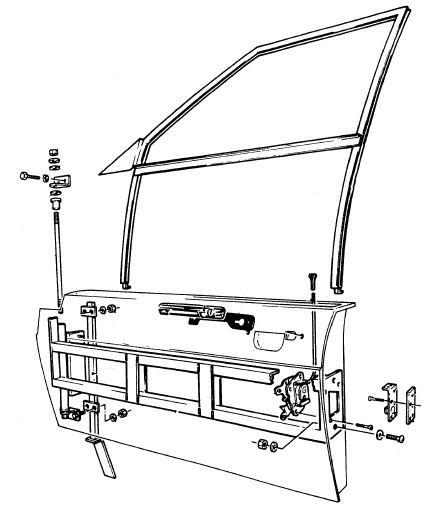
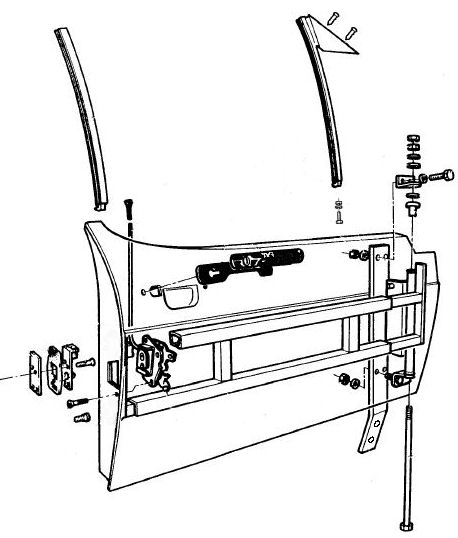
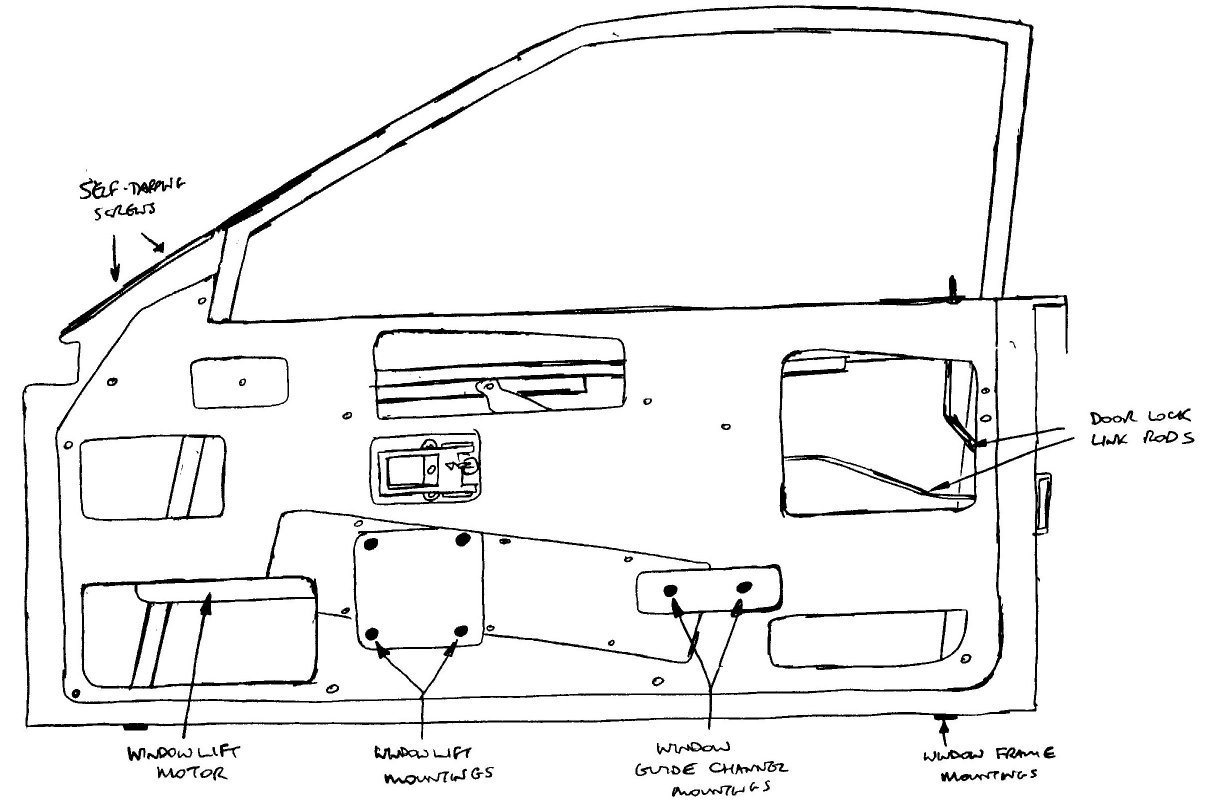
A guide/ support frame for the door glass, fabricated from lengths of channel, is lowered into the door and held in place by two bolts through the door bottom, and two or three self-tapping screws through the triangular plate at the front of the frame. A length of angle connects the front and rear upright sections of the frame, and a simple felt-covered draught-excluder strip is clipped to the lower edge of this angle, inside the door. The door glass channel is fitted with the traditional velvet-covered rubber liner to allow the glass to slide smoothly and quietly. On the DHC the frame is essentially two separate runners, at front and rear of glass. The front one incorporates the triangular fillet plate at top front of door - drawings courtesy of TVR's parts manual:
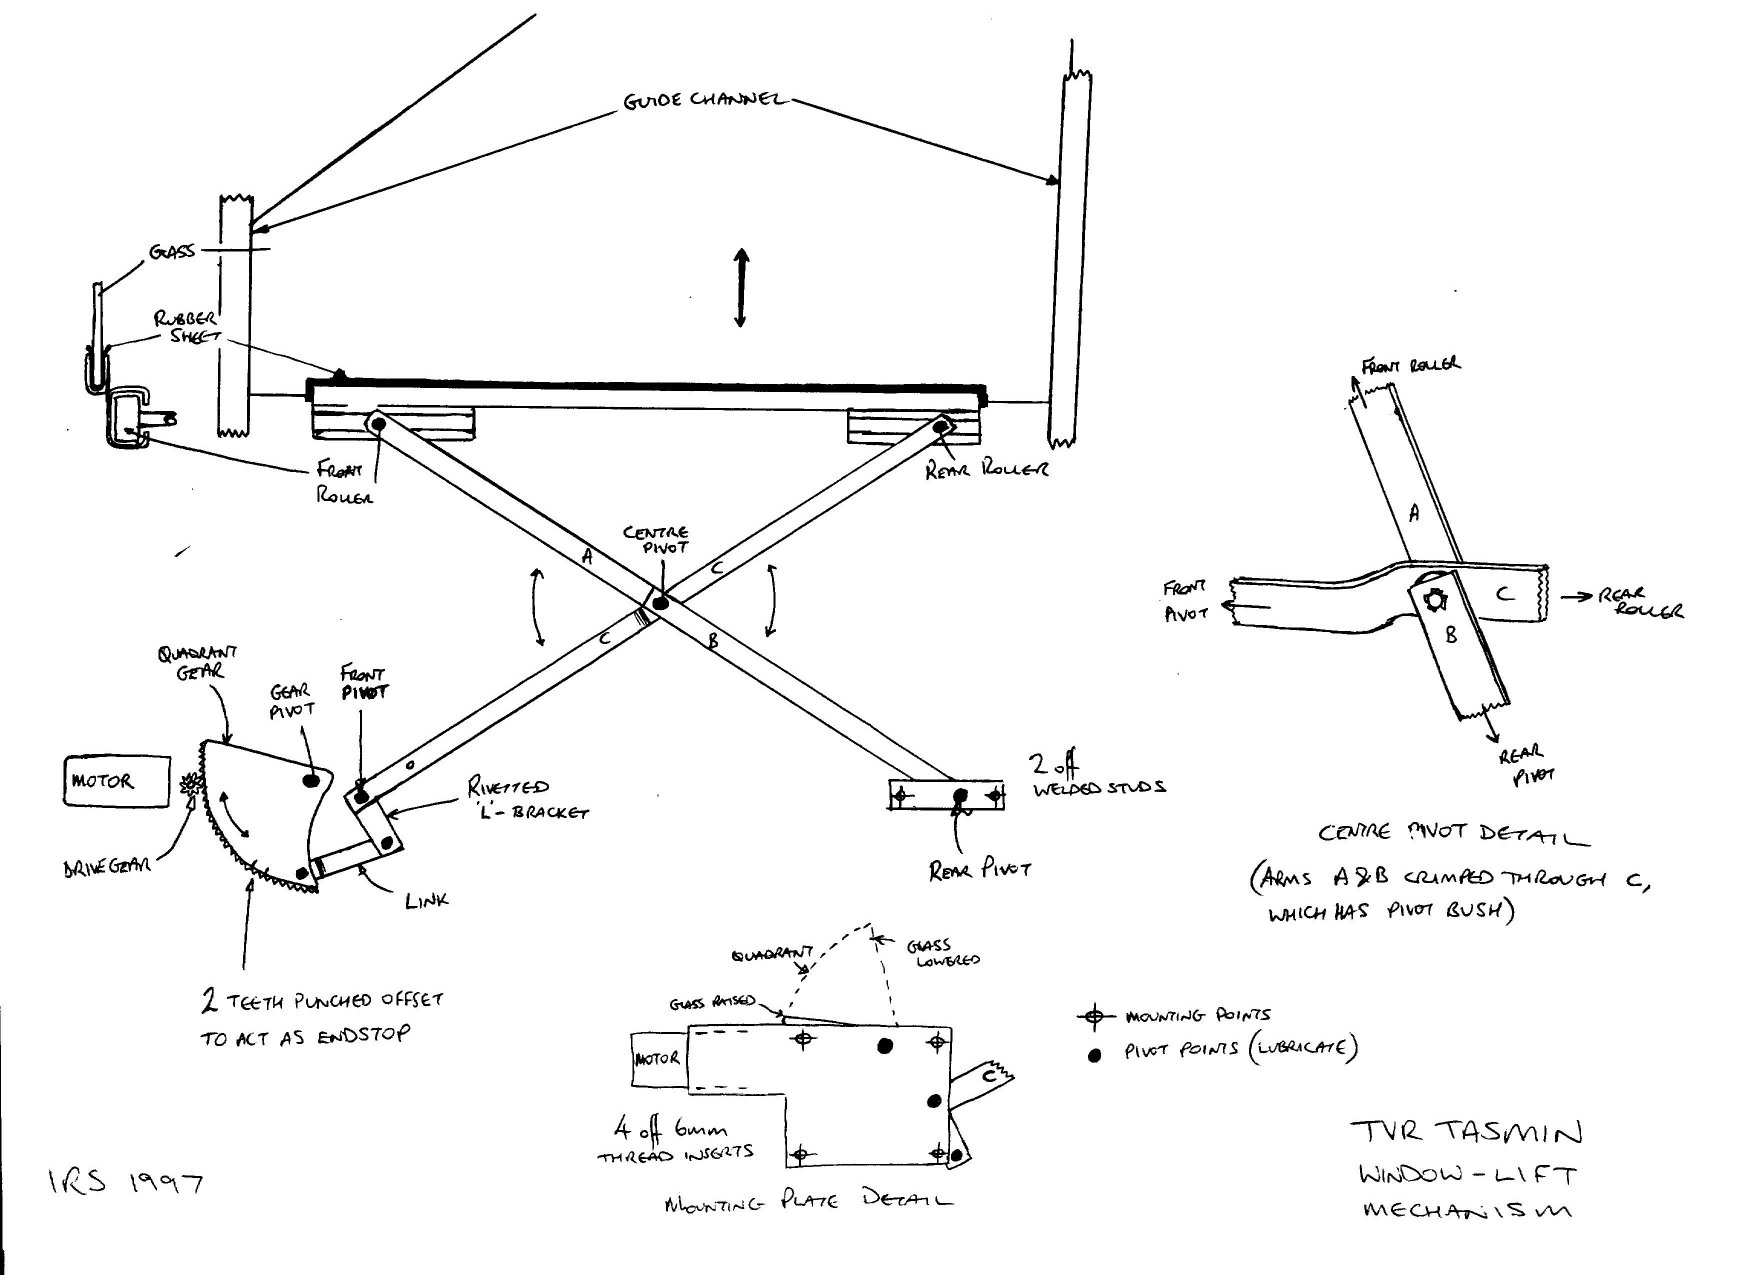
The window-lift motor assembly is bolted to the inside of the square recess in the door (4 bolts), and rearward of this is another recess to which another pivot for the window-lift is secured (2 nuts). Note that the drop-head door has an adjustable travel limit for the glass: this is a simple Bowden cable affair (looks suspiciously like a bicycle brake cable!) that is anchored to the rear glass channel lower mounting by a small L-shaped steel bracket.The internal and external door catch releases (and the lock button) are connected to the catch with simple steel rod linkages; the internal release being located in the recess just above the window-lift motor mountings. The internal release was originally sourced from the TR7; later it changed to the type used on the Metro and similar BL cars.
The external handle was taken from the Cortina; usually seen in chrome but some later cars had black ones and in rare cases the TVR logo was engraved/embossed/cast into them. Various access holes in the inner face of the door shell are closed off with sheets of polythene, glued (or more likely taped, after all these years) around their perimeters. The armrest/ doorpull is held in place in the sloping rectangular recess by countersunk self-tappers (the doorpull being retained to the armrest by Nyloc nuts which are accessible once the armrest assembly is off the door).
If the car has the 'aerodynamic' mirror pods fitted, the mounting screws for the pod pass through the triangular section at the top of the front glass guide - if the nuts seize inside the pods you'll have to take the guide out to access the screw heads. See this page for the electrical workings of the mirrors. As an aside, I wonder if the mirror pods were a nifty way to circumvent some Construction & Use regulation about mirrors needing to fold in on impact with a pedestrian; the streamlined pod shape being intended to deflect instead.
Interior trimming of the door is performed on the early cars by two panels, the upper in vinyl-clad GRP and the lower made from hardboard covered in velour material. Both panels are secured by plastic clips at various points around their perimeters, which fit into holes in the door shell. Later cars had a one-piece GRP panel with a ‘bulging’ armrest. Initially the door release on this was in a similar position to the early cars (although a Metro release was used to drag the aesthetics into the '80s!) but for all late production the door release moved to a tidier location behind the door pull. The panel may be just a tight push-fit on the door, or may have some fixing screws at its lower edge. Finally, the door-release trim plate and the ashtray are screwed into place and the door lock button pressed onto the end of its control rod. Later cars had the ashtray in the centre console, of course, and incidentally the console ashtray was identical to that used in the DeLorean DMC12 (it's also similar but not identical to a Porsche item of the era). As the DMC12 was out of production by 1982 and the TVR revision came later, one wonders whether the ashtrays were in fact DeLorean surplus stock :D
POINTS TO NOTE
1. The frame in which the door glass slides (especially on the FHC) is prone to rot. Originally plastic-coated. Expensive (£350+ in 1997) from the factory and not guaranteed to fit anyway! The felt/ rubber wiper along the inside of the horizontal rail (FHC) disintegrates and drops off. A suitable replacement for the original may be hard to come by. Later DHC cars sometimes have a length of door rubber trim fitted to a lip (on the GRP interior trim panel) here to help clear the glass. TVR apparently never intended the doors to be completely water-tight, rainwater being allowed to run into the door and find it's own way out of large holes drilled in the lower surface of the door.
2. Window-lift motors are very torquey, and can strip the toothed quadrant gear or cause the four assembly mounting holes to open out or become slotted. In extreme cases, the corners of the window-lift mounting recess may be broken away, necessitating some GRP work.
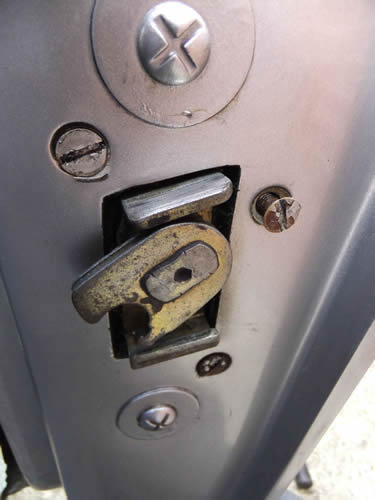
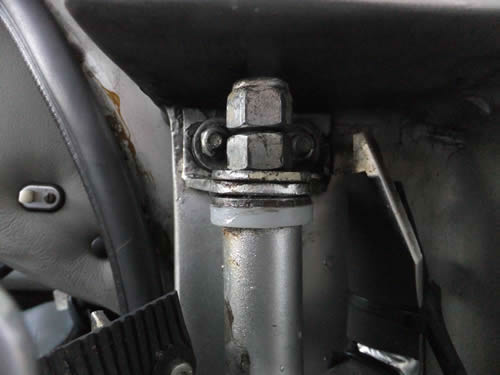
3. The steel framework inside the door (effectively side-impact bars) should need little attention as long as it is not rusting, or damaged in an impact. The frames appear to have been bolted to the car when it was originally sprayed, as the body colour extends part way along the frame section which is inside the door. This may be a useful indication of a car's original colour. Open the door and identify the plastic bushes, steel washers and Nyloc nuts at the top and bottom hinge plates. When you move the door, the bushes should rotate with the pivot tube, but everything else should stay still. If the nuts and washers move, the pivot rod has seized into the bushes and will wear the holes in the hinge brackets oversize, allowing the door to drop. The Nylon bushes wear over time, also allowing the door to drop, but they're a simple 'top hat' shape and can be easily reproduced on a lathe if new items are unavailable. The hinge tubes usually have a grease nipple fitted but since Nylon reacts with certain petrochemicals causing it to swell, adding 'normal' grease could do more harm than good. When I stripped the pivot on my driver's door (see further down page) I found that the grease is an unusual type, seems almost like butter; could be the factory knew better than to pump it full of Castrol LM ;)
4. The internal door-pulls on early cars are hardwood lengths veneered in walnut. Veneer on the door-pulls is affected (like the rest of the interior woodwork) by temperature, humidity and flexing of the 'ground' wood when pulled. Usually the lacquer cracks first (which is unsightly anyway), then the 1mm or so veneer is affected directly. Original door-pulls have serial numbers stamped on their backs and were presumably made in pairs, although a cabinet-maker once told me that a true 'matched' pair would traditionally be made by covering each piece with consecutive sheets of the veneer, so a 'mirror-image' effect results. Whether TVR were ever so critical about this is uncertain. Although one could obviously make some simple replacements from solid pieces of hardwood, the result would probably not be as pleasing as the 'real thing'. Re-veneering is available, although some specialists insist on having all of the car's woodwork to work with, so that colour or grain differences can be minimised. Later cars (with the ‘bulging’ arm-rests) use a simpler, vinyl-clad door-pull - and 'fake' veneer that is basically a plastic laminate (think Formica). On these cars there is also usually a slim ‘veneered’ strip along the inner door panel that drops to pieces if handled carelessly.
5. The early upper (GRP) trim panel for the door can suffer from cracking if care is not taken when fitting. Lower the door glass and locate the front end of the trim panel over the door top edge, then swing the trim down at the rear, feeding the lock control rod through it's hole before thumping the plastic clips into place
6. Avoid using excess force on the screw which secures the internal release trim, as the plastic is brittle and will crack around the mounting hole, causing the trim to fall off. Difficult to repair and hard to find in breakers' yards now. It probably goes without saying, but the hardwood lower trim panel on the early cars is not the best mounting point for loudspeakers, even if you are completely undemanding of audio quality. Apart from the lack of rigidity which high-output speakers need, the amount of water that enters the door will soon destroy the speaker cones. Later cars incorporated a GRP drip guide that directs the water away from the speakers, and the later GRP door panel is also more rigid, but it’s as well to be aware of the pitfalls before spending your money on Pioneer’s finest.
7. The steel reinforcing posts fitted inside the ‘A’ and ‘B’pillars are bolted through the GRP shell to the sill plates. A length of plate is welded to the bottom of the tube and bent to conform to the sill angle. This plate is the first bit to corrode, usually along with the outer sill plates and the chassis tubes! Once it rusts through, the door pillars have less strength, as they are basically relying on the GRP to hold everything together. If you find that the sill tubes and/or plates need repair, it’s as well to check these reinforcements as well.
The window-lift mechanism (taken from the Rover SD1!) looks like this once removed from the door:
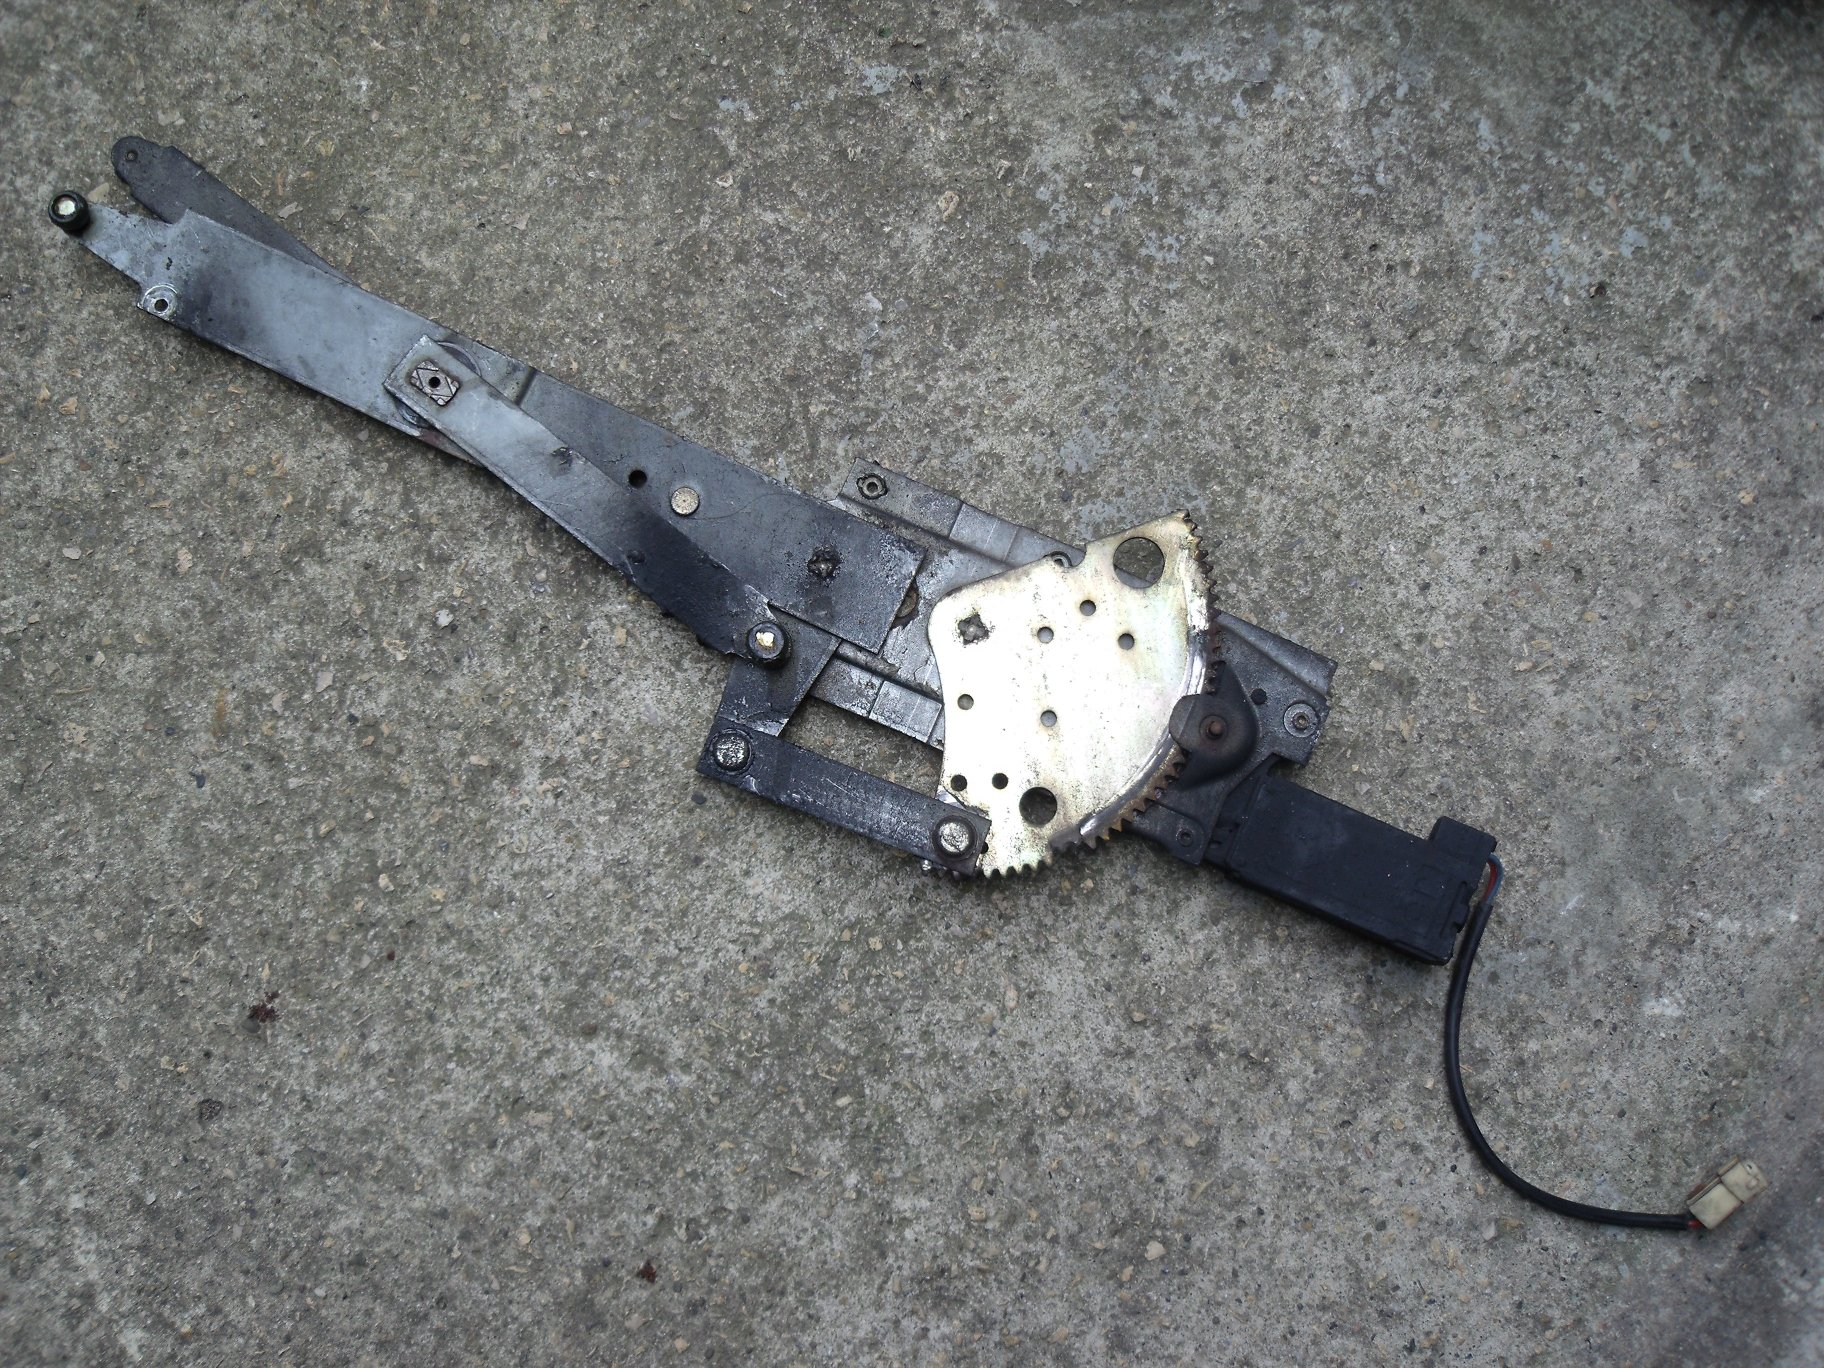
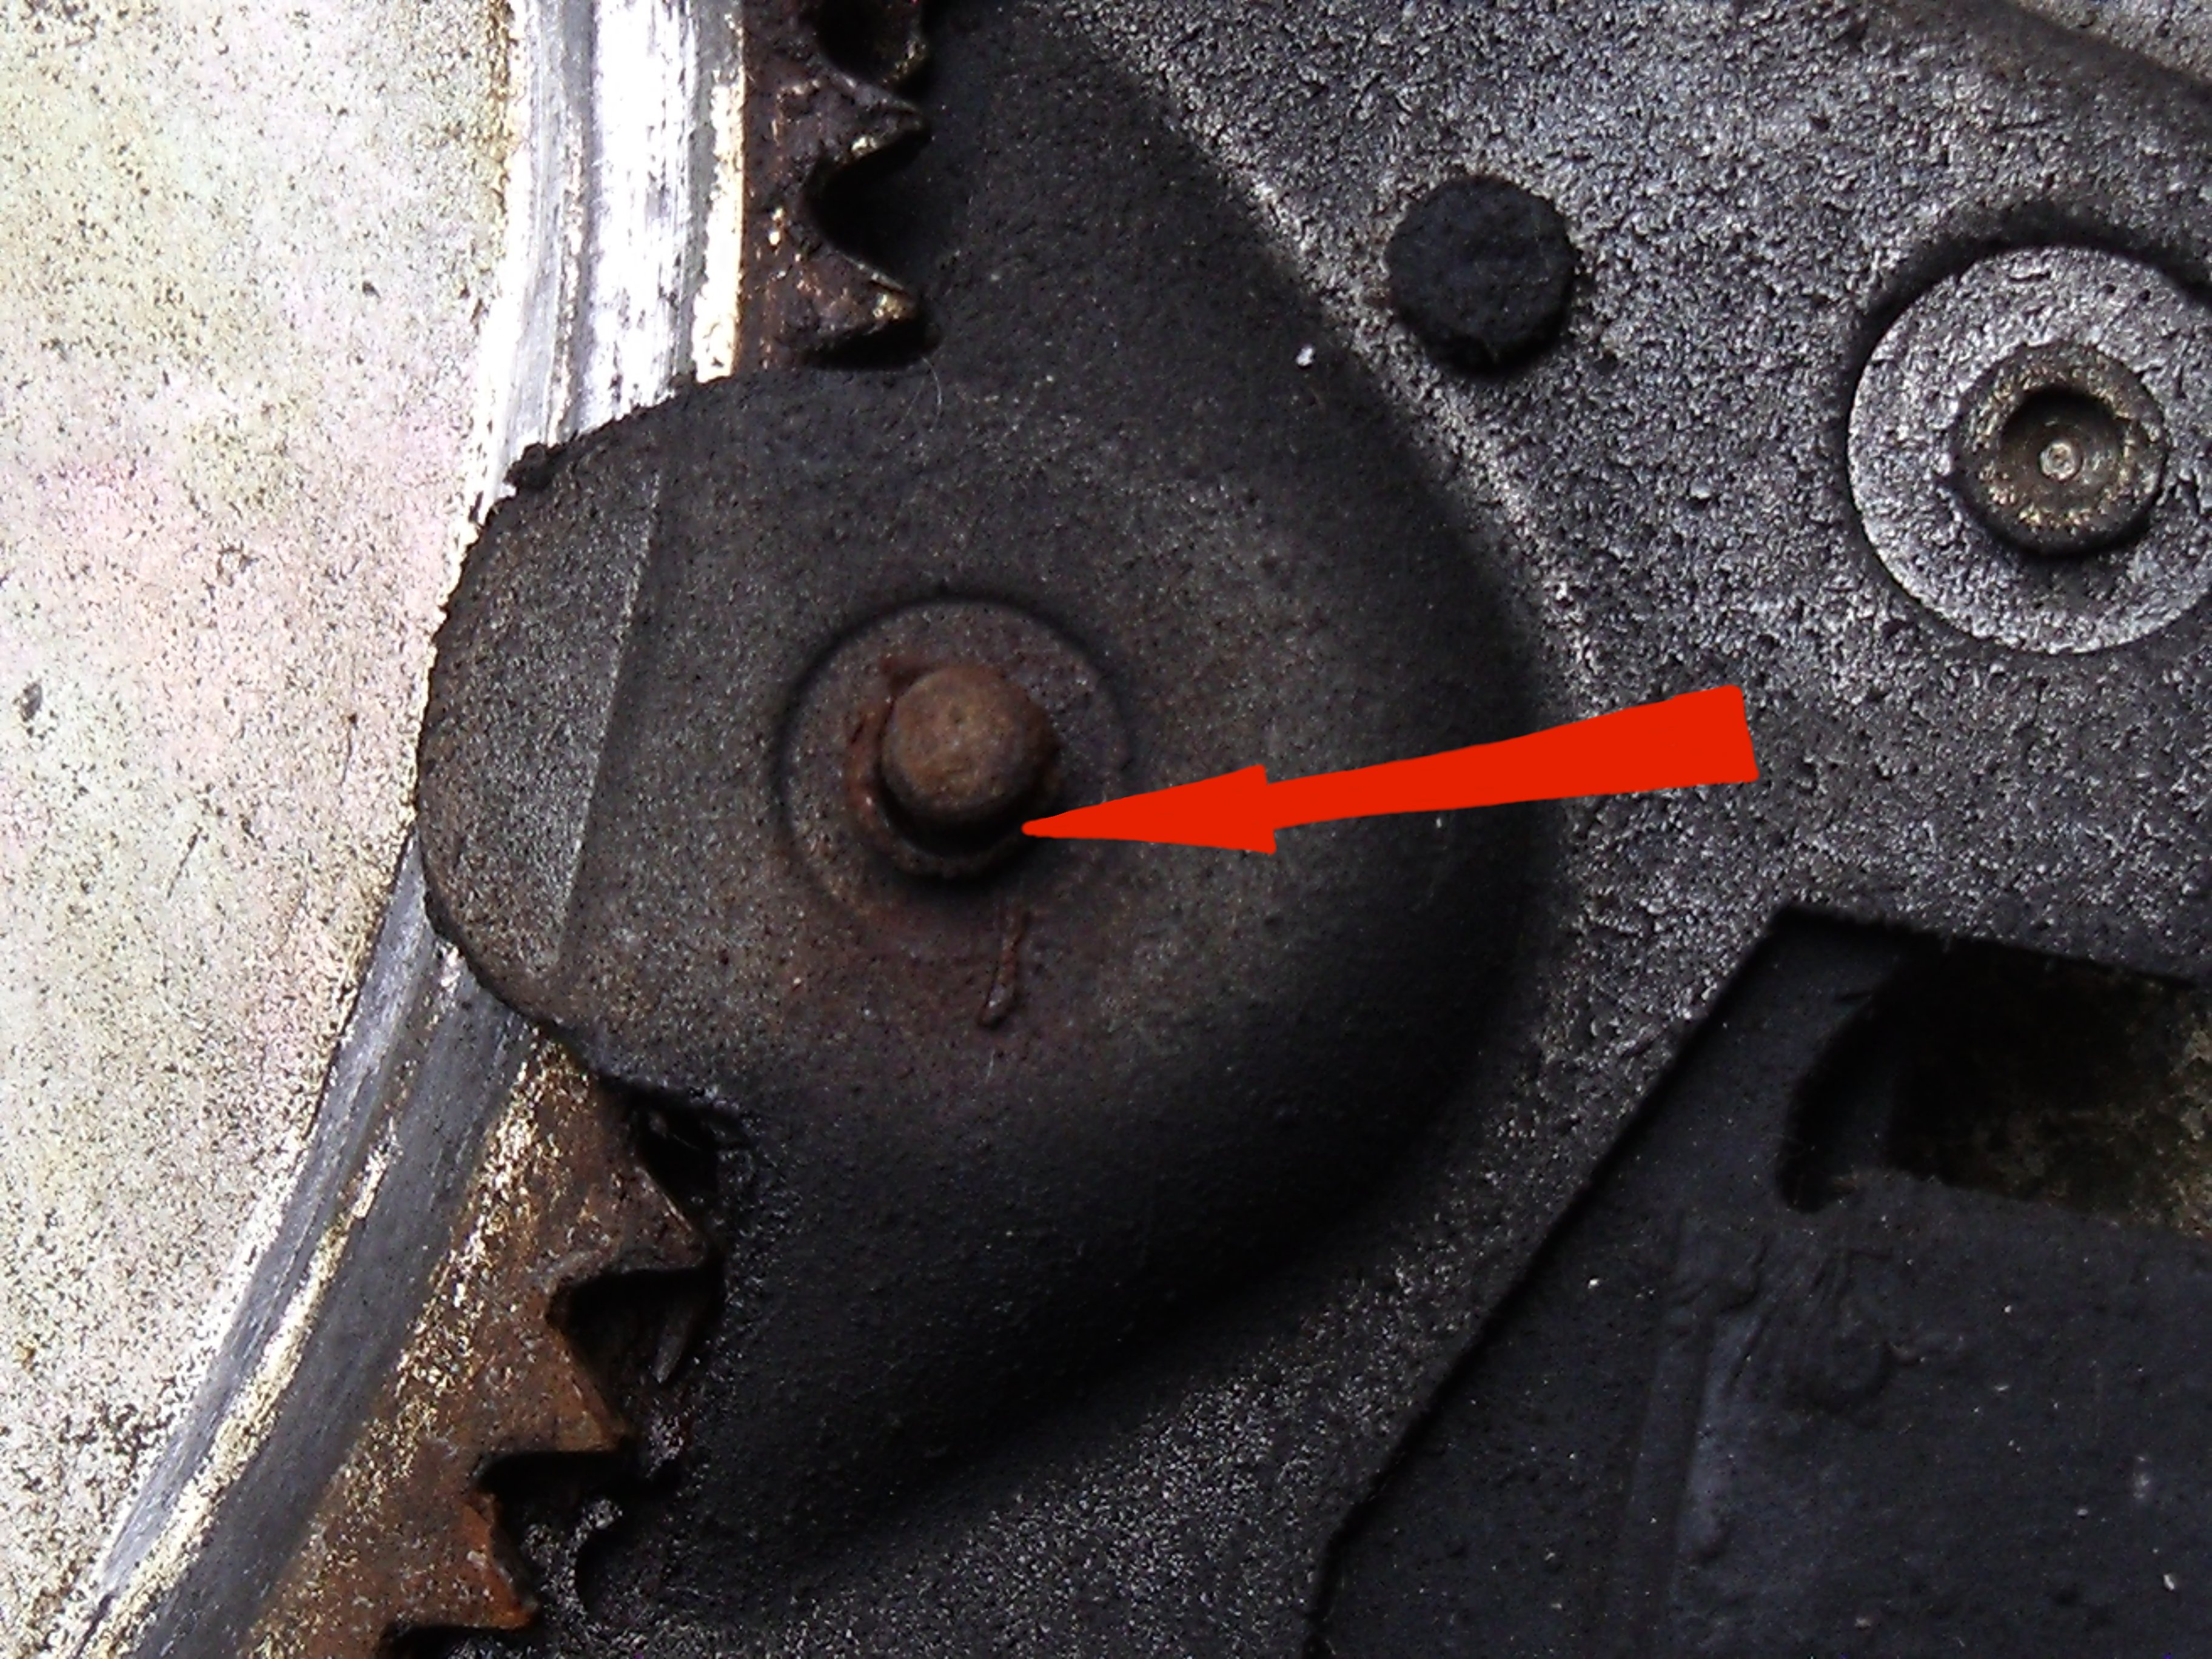
One point to watch out for is the pinion pivot; if you notice a lot if juddering when the window is being lowered, but lifting is OK, check the condition of the pivot. It's a simple arrangement of a shaft turning in a pressed metal 'bush', but once it wears as in the picture below, repair is probably impractical:
New window lift mechanisms were still available from Rimmer Bros. as of March 2013; they can also be found via online auctions.
UPDATE September 18: Pivot bush replacement
As long as I've had the 390 there's always been a bit of play in the door pivot. If you gripped the trailing edge of the door and lifted it there was clearly some play; the way it usually manifested itself was that as you closed the door, even slight downward pressure would make the latch clatter into the striker pin on the B-post rather than smoothly closing around it. As described above, the pivot arrangement is quite simple, however it means a virtual full strip-down of the door to rectify. This is because all of the door internals foul the side-impact frame as you try and slide the shell off the frame. In an ideal world you'd just remove the nuts and drop the pivot pin out, but you can't take it out from above because the wing is in the way and it won't come out from below without first taking the sill off. The method I used is as follows and leaves the top hinge bracket firmly in place to give a reference when refitting the door - there's a range of adjustment fore and aft, in and out and up and down, so the less you have to alter the better! I started by cleaning away grease and muck from the pivot area and drawing around the various brackets and packing washers with a fine-tip marker to aid reassembly. Then I removed the internal trim panel. Next the various control rods for the latch were disconnected and the latch mechanism removed (for a bath in degreaser).

The door glass was lowered and the rear guide channel removed, which also frees the simple cable arrangement that limits how far the glass will lift.
The mirror assembly was removed from its pod and the wires disconnected (you would of course make a note of where they go ;o). The front glass guide channel can then be unbolted from the door bottom and the self-tapping screws at the top of the triangular plate removed.
This allows the guide to be lifted out, passing the mirror wires through it as you go. Now comes the fun part: you have to extract the door glass, which by now is flopping around inside the shell. I did it this time (it seems to vary with experience!) by raising the glass about halfway and then removing the short length of channel that serves as the rear mount for the 'scissor' frame. The glass can then be tilted forward and slid along its guide rollers until it detaches from the scissor and can be lifted out of the door.
Now all the electrical connectors can be disconnected at the front of the door and the wiring pulled out. Removal of the nuts and packing washers from the captive studs at the front, and the two screws & nuts from the rear of the door frees the shell (which will drop as you loosen everything). At this stage you will expect to simply slide the door shell off the steel frame but unfortunately the window lift mechanism can't pass the latch plate at the rear of the frame; if you need the shell off the frame altogether you'll also have to remove the lift mech. In my case I didn't need the shell off, so I just slid it backwards far enough to give me access to the pivot assembly. Some cars had a long bolt through the pivot; this car has a length of steel rod threaded at both ends. The bottom end has less thread than the top and here a Nyloc nut is fitted; the top end has a plain nut and a Nyloc. Crack the top Nyloc and wind it up as far as it will go (the wing gets in the way), then wind the plain nut up after it.
Now use a spanner on the lower Nyloc and by working it both ways, the pivot rod can be made to move down through the bushes, allowing the top Nyloc and eventually the plain nut to be extracted. Support the shell and frame, then remove the nuts and washers securing the lower hinge bracket to the bodyshell. Swing the bottom of the door outward to disengage the lower hinge bracket and the pivot rod should come out of the top bracket. Collect all the various washers and nuts.
Now lay the shell down on some suitable cushioning, slide the frame a few inches out out of the door and drive the pivot rod/bolt out of the bushes.
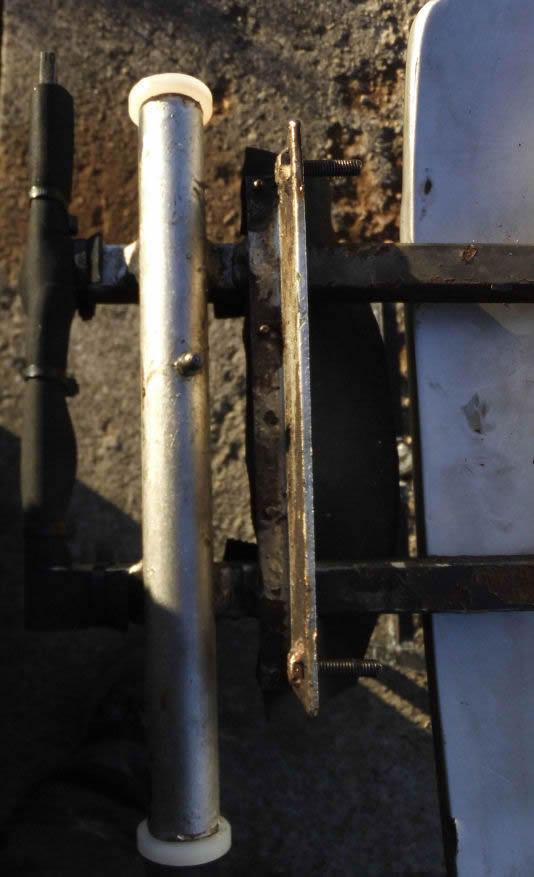
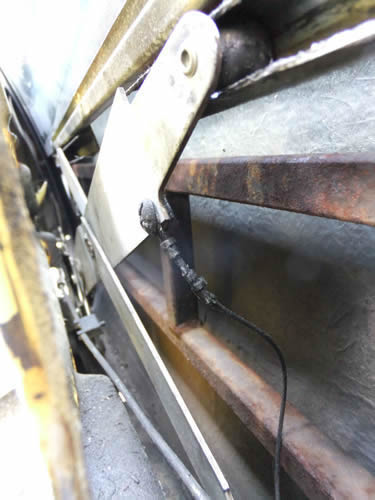
The rod can then be used as a drift to gently knock the two Nylon bushes out of the pivot tube. I found that the top three inches of the pivot rod (the length that passes through the Nylon bush) was quite extensively marked and pitted. The washer that sits between the top of the bush and the lower face of the hinge bracket was also marked and rusty; it appears that water has penetrated here and done its dirty work. I polished the shaft up as best I could and skimmed the large washer in the lathe. Having made new Nylon bushes they were driven into the pivot tube with a rubber mallet and the pivot rod reinstalled with the various brackets and washers in the correct order. Plenty of silicone grease was used! The door frame was offered up to the car and the plain nut wound a few turns onto the top of the pivot rod to take the weight of the door while the lower pivot bracket nuts & washers were refitted - the outline of the bracket in the paint was used as a guide for relocation. The plain nut was then wound down the pivot rod, which pulled it up through the bushes until the top Nyloc could be refitted. It was then a simple matter to pull everything up tight and slide the shell back into place, feeding the electrical wiring through the large slot at the front edge of the door. There had originally been a rubber flap here, presumably to cut down on the draught blowing in through the door :D - it was long gone so I drilled out the rivets and made a new flap which was fitted with stainless screws. A slit in the flap allows the wiring into the door. I also wrapped a length of rubber sheet around the steel bar that serves to check the door in the full-open position: I think the idea is that the extension of the steel bar at the top is supposed to hit the upper hinge bracket and stop the door (see two photos up) but essentially the whole bar seems to contact the fibreglass bodyshell, with some localised marking where it's been doing so for 31 years! The rubber should reduce the impact. Here's the rebuilt pivot assembly with the doorshell about to be slid back into place:

Next it was time to refit the packing washers and nuts to the two studs inside the front of the door, and the two screws and nuts at the back of the door, above and below the latch hole. As the latch screws also have to pass through the frame and shell here, and the holes aren't slotted, it was easy to realign the rear of the door. It took a few minutes to get the alignment of the front correct, however, and the amount of slotting and redrilling in the front face of the door suggests that the factory didn't get it right straight away either :D Once the door was realigned with the shell it was time to refit the degreased latch mechanism, connect all the rods and try it for operation - and it's much better than before! If you try to lift the rear of the door now, the whole car goes with it. After a much-needed coffee break (with multiple digestive biscuits) it was time to do the dance with the door glass; lower it back into the door and then use a torch to spot where the scissor rollers have gone. Locate the two channels at the bottom of the glass onto the rollers, move the glass around until you can get the lower rear guide into place and secure with washers and nuts. Then refit the front and rear guide channels (or the entire window frame if a FHC), with piles of packing washers inside the bottom of the door. The glass lift height adjusting cable is secured by one of the rear guide channel bolts. Reconnect the lift motor and power the window up and down, adjusting the guide channels as necessary for smooth operation. On a DHC, with the glass fully raised, move the door as if closing it, but stop before the latch hits the striker and check to see how the glass lines up with the targa roof seals. Adjust the lift height stop cable to align the glass. Reconnect and refit the mirror and other electrical connections (e.g. central locking if fitted), check everything operates as it should then fit the interior armrest and trim panel (reconnect the loudspeaker if not already done). There: that's another five-minute job done... ;O)